Step-by-Step Guide to Make Favorite Basic Pie Dough (Voitaikina in Finnish)
By Easy Recipes18 November 2019
Step-by-Step Guide to Make Favorite Basic Pie Dough (Voitaikina in Finnish)
Hey everyone, I hope you are having an amazing day. Today I’m gonna show you a way to prepare a special dish, Basic Pie Dough (Voitaikina in Finnish). This is one of my favourite food recipe, this time i will make it a little bit tasty. This is gonna smell and look delicious.
Basic Pie Dough (Voitaikina in Finnish) Recipe. Voitaikina esim pasteijoille, joulutortuille ja peltilihapiirakoille. Itse tehty voitaikina voittaa kaupan valmiit versiot ylivoimaisesti ja kotivoitaikinasta tehdyt leivonnaiset, kuten blogin joulutortut, ovat taivaallisia.
You can have Basic Pie Dough (Voitaikina in Finnish) using 9 ingredients and 10 steps. Here is how you cook it.
Ingredients of Basic Pie Dough (Voitaikina in Finnish)
Take of (A).
Take 500 grams of Flour (all-purpose flour).
Prepare 1/2 tbsp of Salt.
It’s of (B).
It’s 250 ml of Cold water.
It’s 50 grams of Liquid margarine (melted butter).
You need of (C).
Make ready 300 grams of Margarine or butter.
Make ready 1 of Flour for dusting.
Overworking the dough and using too much flour can make pie crust tough and dry.Try to keep a light hand with both, rolling just enough to.Learn how to make a basic pie dough with Chef Instructor Jonathon Knight from Auguste Escoffier School of Culinary Arts.Visit our blog to see the.
Basic Pie Dough (Voitaikina in Finnish) step by step
About the ingredients: You can use a mixture of cake and strong bread flour in place of all-purpose flour. Adjust the amount of salt if using salted butter. If unsalted, use about 10 g of salt..
Combine the (A) ingredients in a large bowl, and thoroughly mix. Create a well in the middle of the mixture. Pour in the (B) ingredients. Stir the dry ingredients, as if tossing them from the bottom of the bowl, covering the moist sections. Repeat this until the dough becomes crumbly. Do not knead..
Once it has reached an even crumbly texture, bring it together into a ball, and wrap in plastic wrap. Let it chill in the refrigerator for 1 hour. By making a cross in the top, as shown in the photo, it will chill more evenly, and will make it easy to roll out into a square..
Pound down the butter from the (C) ingredients with a rolling pin, and roll it into an 8-mm thick square. This step is easier if you sandwich the butter in plastic wrap or put it in a vinyl bag. Chill this in the refrigerator..
Roll out the dough from the A and B ingredients, place butter on top as shown, then fold in the corners as though wrapping the butter. Cover the butter completely, without allowing any to show, then even out the thickness by pounding with a rolling pin..
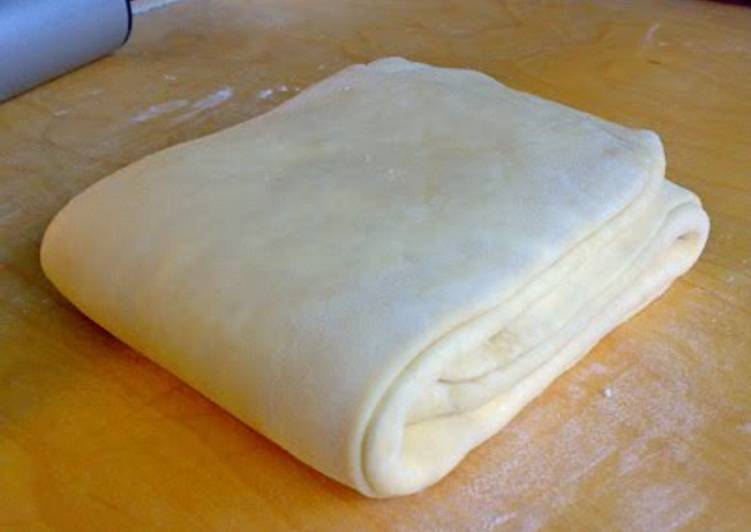
[Fold the dough into fourths] Using a rolling pin, roll the butter-wrapped dough into a long rectangle. To fold the dough into fourths, bring both ends to meet in the center, then fold it in half, as shown. Wrap in plastic wrap, then chill in refrigerator for 20 to 30 minutes..
Fold the dough into thirds: Roll the long dough even longer, then fold into thirds (rotating the dough 90°). Wrap in plastic wrap, then chill in refrigerator for 20 to 30 minutes again..
Repeat Step 6 and 7, chilling in between, which will make a total of 144 layers (4 x 3 x 4 x 3 = 144). After the 3rd or 4th time rolling the dough, the butter will start to stick out, so be sure to dust your working surface well with flour, and shake off any excess..
The dough is ready. It will keep in the refrigerator for 3 to 4 days. Use it for making Christmas tarts, quiches, or other dishes..
Addendum: The best way to get a nice crisp crust is to bake the chilled dough at a high temperature (over 200℃) and for a short time! Depending on your type of refrigerator, you may not be able to chill the dough thoroughly enough in just 20 or 30 minutes. In that case, it might be best to let it chill in the freezer..
Made this for our Thanksgiving Day pies and could not believe how easy it was!Pie Crust Without Fear: Even experienced cooks can find it intimidating to make pie pastry.The following tips will help you turn out a terrific crust with ease.
Pie dough is one of those things that a lot of people, even some really good bakers, find intimidating.You can use whatever recipe floats your boat - they are all variations on a basic theme, and there are just a few key techniques that help you achieve that buttery flaky crust we all love.By Marian Cooper Cairns and Dawn Perry.Divided dough into two piles; wrap each in plastic wrap.Use the plastic to flatten and press dough into disks.